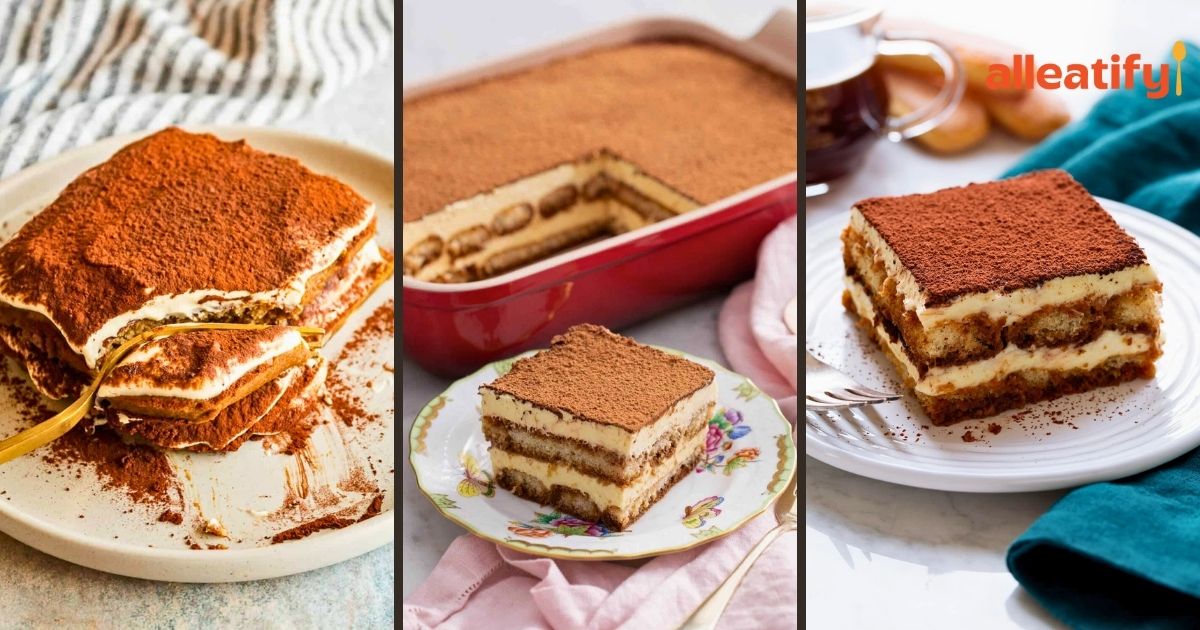
Quick 25-Min Tiramisu Recipe for Busy Nights in 2026
There’s a quiet moment before your first bite of tiramisu. Your spoon sinks into the soft layers. You feel the cream, the coffee, the cocoa… all waiting to surprise you.
Most people think tiramisu is complicated. They imagine expert hands and restaurant-level skills. They picture something too fancy to make at home.
But here’s the twist. Tiramisu is actually simple. It’s forgiving. And it comes together with a few basic steps.
In this guide, you’ll learn how to brew the coffee, mix the cream, and build the layers. Everything is easy to follow and beginner-friendly.
Ready to reveal the secrets behind this iconic Italian dessert? Let’s begin.
What Makes Tiramisu So Special?
Tiramisu is a modern Italian dessert with roots tracing back to the 1960s or 70s. Despite its relatively young age in the world of classic recipes, it’s become an icon of Italian cuisine.
The name “tiramisu” means “pick me up,” and that’s exactly what this treat does with layers of espresso-soaked ladyfingers and a rich mascarpone cream filling.
This dessert is the perfect balance of:
- Creamy vs. airy
- Bitter espresso vs. sweet mascarpone
- Boozy warmth vs. cool, refreshing chill
It’s a sensory experience.
Ingredients You’ll Need
Here’s a simple table to help you gather all the essentials for this incredible homemade tiramisu:
| Ingredient | Amount | Purpose |
| Brewed espresso or coffee | 1½ cups (room temp) | Base for soaking the ladyfingers |
| Dark rum | ¾ cup (½ for soak, ¼ for cream) | Adds depth and warmth to both components |
| Mascarpone cheese | 16 oz (450g) | Creamy, tangy filling |
| Egg yolks | 6 | Forms the rich custard base |
| Granulated sugar | ⅔ cup (133g) | Sweetens the custard |
| Heavy whipping cream | 2 cups (cold) | Makes the mixture light and fluffy |
| Vanilla extract | 2 tsp | Adds aroma to whipped cream |
| Ladyfingers (Savoiardi) | 2 packs (about 40) | Form the layers of the dessert |
| Cocoa powder (Dutch-processed preferred) | ⅓ cup | Dusts the top, adds a bittersweet finish |
Optional:
- Chocolate shavings or curls for garnish
- Edible flowers for presentation
Note: You can personalize your tiramisu by swapping dark rum for amaretto, orange liqueur, or even a coffee liqueur like Kahlúa!
How to Make Tiramisu: 8 Steps
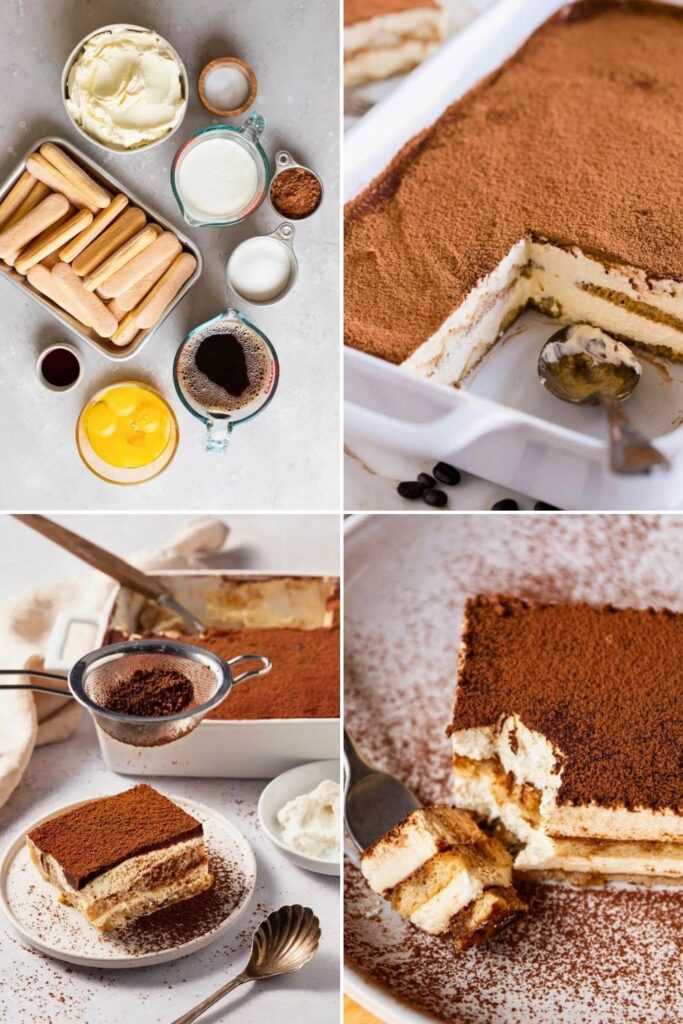
Tiramisu may look fancy, but once you understand each step, it becomes one of the easiest desserts to master.
Each layer plays a special role, from the bold espresso to the silky custard, the airy whipped cream, and the delicate ladyfingers.
Below is an in-depth walkthrough of the entire process, based entirely on the subtitle content, expanded so that you not only understand what to do, but also why it works.
Step 1: Brew the Coffee Base
The soul of tiramisu starts with a strong, aromatic coffee mixture. This is what gives every bite its signature flavor. Begin by brewing 1½ cups of espresso or very strong coffee.
You can use a Moka pot, an espresso machine, or even a concentrated French press. The goal is to extract a rich, deep coffee flavor that can stand up to the layers of cream.
Let the coffee cool down to room temperature before using it. Hot coffee will make ladyfingers soggy and cause the layers to collapse.
Once cooled, pour the coffee into a medium bowl and stir in ½ cup of dark rum. This combination becomes your dipping liquid for the ladyfingers. The rum adds warmth, richness, and that quintessential tiramisu aroma.
You can fully personalize this mixture:
- For alcohol-free tiramisu → simply double the coffee.
- For a stronger flavor → mix rum with coffee liqueur, orange liqueur, or amaretto.
- For dessert lovers who enjoy bold notes → use Kahlúa or Mr. Black.
The dipping liquid should have a bold, slightly boozy, and deeply aromatic scent. That’s when you know it’s perfect.
Step 2: Make the Mascarpone Base
Mascarpone is the creamy heart of tiramisu. It creates that luscious texture everyone loves. In a large bowl, add 16 ounces of mascarpone. If you’ve never tasted mascarpone on its own, imagine something between thick cream and mild cream cheese, rich, velvety, and luxurious.
Next, add ¼ cup of dark rum to the mascarpone. This deepens the flavor and ties the cream layer to the coffee-soaked ladyfingers.
Whisk the rum and mascarpone together using either:
- A hand whisk (for a slow, controlled blend)
- A hand mixer (for more speed and smoothness)
Whip until the mixture is silky, creamy, and uniform, with no lumps remaining. The aroma at this stage is already irresistible, a blend of subtle sweetness and warm, boozy notes.
If you’re making tiramisu for kids or prefer a non-alcoholic version, you can completely omit the rum. But this dessert traditionally leans toward being boozy, so it’s entirely your preference.
Set this bowl aside while you prepare the custard.
Step 3: Create the Custard (Zabaglione)
Zabaglione is the luxurious Italian custard that binds everything together. It gives tiramisu its structure and signature creaminess.
You’ll need a double-boiler setup:
A medium pot filled with 2 inches of simmering water + a medium bowl that sits on top without touching the water.
Add 6 egg yolks to the bowl. Set the whites aside for another recipe. Now whisk in ⅔ cup (133g) of granulated sugar until the yolks and sugar form a cohesive mixture.
Place the bowl over the simmering water. Begin whisking gently but continuously. This prevents the yolks from scrambling and ensures they cook evenly.
The goal is to:
- Dissolve all sugar grains
- Lightly cook the yolks to about 160°F (food safe)
- Achieve a pale, creamy, slightly thick consistency
This process takes 5 to 8 minutes. You’ll notice several changes:
- The mixture lightens in color
- The texture becomes shiny and smooth
- The volume increases slightly
- It turns custard-like and luxurious
This is your zabaglione: warm, silky, sweet, and full of potential.
Remove it from the heat and let it cool for a moment.
Step 4: Combine the Cream Mixture
Now it’s time to combine the mascarpone and zabaglione. Pour the warm custard directly into the mascarpone mixture. Use a hand mixer to blend the two ingredients into a smooth, flawless cream.
The mixture will be slightly loose at this stage because the custard is still warm. Don’t worry, chilling will fix that. The goal right now is to achieve a smooth, rich base with no streaks.
Cover the bowl lightly and refrigerate it for 10–15 minutes. This helps the cream thicken slightly before folding in the whipped cream.
Step 5: Whip the Cream
This is the step that gives tiramisu its signature lightness. In the bowl of a stand mixer (or a large mixing bowl with a hand mixer), add:
- 2 cups cold heavy cream
- 2 teaspoons vanilla extract
Cold equipment makes a huge difference, so chill your whisk and bowl if possible.
Start mixing on low, then gradually increase to high speed. Stop when soft peaks form, peaks that stand but have a gentle curve at the tip.
Avoid over-whipping. If the cream starts turning grainy, you’re heading toward butter territory. Finish the last few strokes by hand to stay in control.
The whipped cream should be:
- Smooth
- Airy
- Light but stable
Place it in the fridge briefly if you won’t be folding it immediately.
Step 6: Assemble the Tiramisu
Before assembling, prepare your dish in a 9×13-inch baking dish, which works perfectly.
You’ll also need:
- Approximately 40 ladyfingers (Savoiardi)
Now dip each ladyfinger into the coffee-rum mixture. But here’s the secret:
Do NOT soak them. Only dip for 1–2 seconds.
Ladyfingers are dry and spongy. They absorb liquid fast. If oversoaked, they fall apart and make the tiramisu mushy.
Dip, flip, remove, that’s it.
Arrange your dipped ladyfingers in a single layer, snugly covering the bottom of the dish. Fill in the gaps by trimming the cookies as needed.
This forms the foundation of your tiramisu.
Step 7: Layer It All Together
Once the first layer of ladyfingers is in place, spread half of the mascarpone cream mixture over them. Use an offset spatula to make an even layer.
Next:
- Repeat the dipping and placing process for another layer of ladyfingers.
- Spread the remaining mascarpone cream on top.
Smooth it gently without pressing down too hard. The final top layer should look luscious and thick.
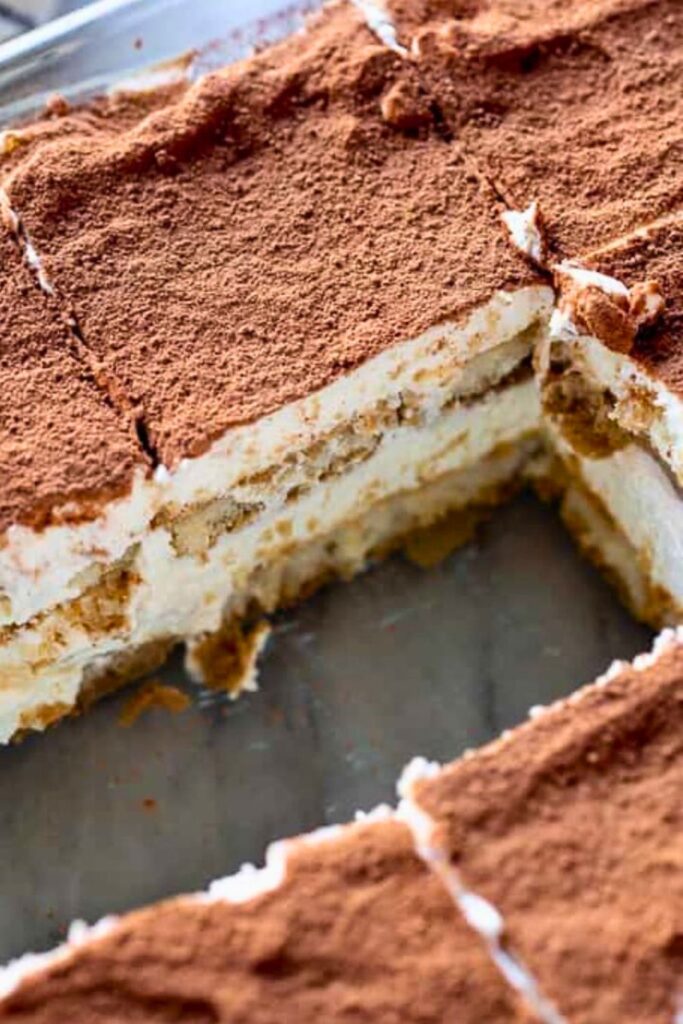
Now, dust the entire surface with ⅓ cup of cocoa powder using a fine sieve. A good layer of cocoa balances the sweetness and enhances the coffee notes.
You can decorate the top with chocolate curls or edible flowers for a touch of elegance.
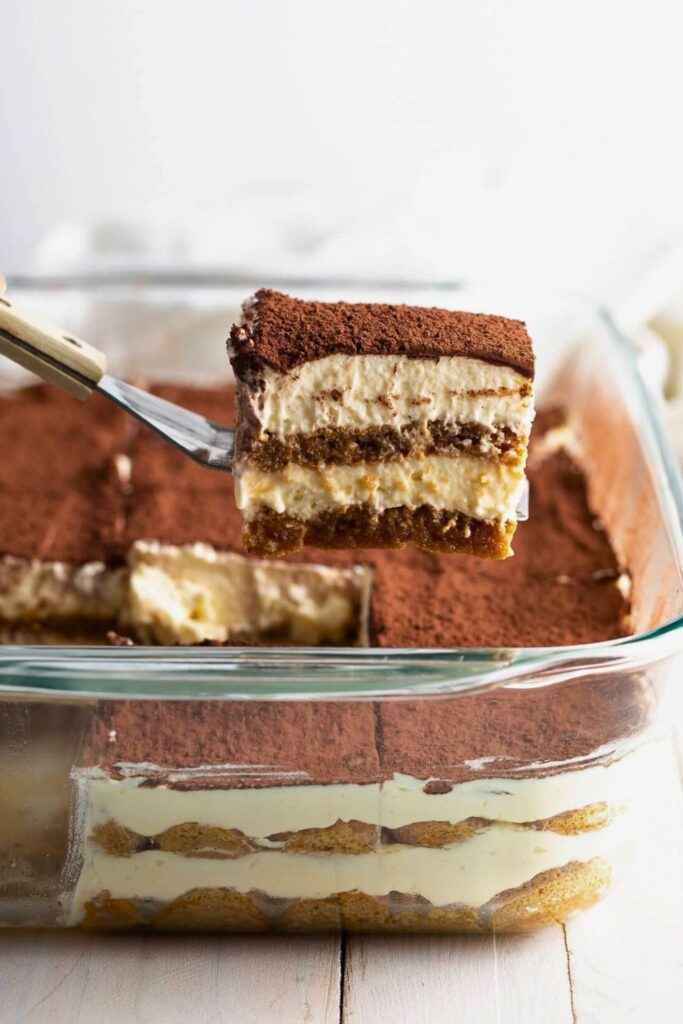
Step 8: Chill and Serve
Tiramisu needs time to set properly. Once assembled, place the dish in the refrigerator for at least 6 hours, but overnight is best.
During this time:
- The mascarpone layers firm up
- The ladyfingers absorb just the right amount of moisture
- Flavors meld beautifully
When you’re ready to serve, cut clean squares using a sharp knife. Wipe the blade between cuts to keep those layers picture-perfect.
Each bite should be:
- Creamy
- Slightly boozy
- Coffee-forward
- Balanced with cocoa bitterness
It’s everything tiramisu should be.
5 Tips for the Best Tiramisu
A great tiramisu isn’t just about following the steps; it’s about understanding the little tricks that make it go from “good” to “unforgettable.” These five tips, based on the process, ensure your tiramisu turns out creamy, flavorful, and perfectly balanced every single time.
1. Don’t Oversoak the Ladyfingers
Ladyfingers absorb liquid almost instantly. Dip each one for no more than two seconds, flipping quickly. If they’re soaked through, they will fall apart and turn the entire dessert into a soggy mess. A barely soaked center allows the cream to soften them perfectly overnight.
2. Get the Zabaglione Texture Right
The custard (zabaglione) must be heated gently and whisked constantly. When the sugar dissolves and the yolks turn pale, creamy, and slightly thickened, you’ve hit the sweet spot. This step gives tiramisu its body and stability.
3. Use Cold Tools for Whipped Cream
Cold cream, a cold bowl, and a cold whisk lead to airy, stable whipped cream. This helps the final mascarpone mixture stay light and silky without deflating.
4. Chill Overnight for Perfect Slices
Tiramisu needs time to set. Refrigerating overnight allows the flavors to blend, the cream to firm, and the ladyfingers to soften just enough. Slicing too early results in messy layers.
5. Use High-Quality Coffee and Cocoa
The flavor of tiramisu depends heavily on these two ingredients. A bold espresso and dark or Dutch-processed cocoa powder elevate the dessert dramatically. The deeper the flavors, the more luxurious the final result.
Variations to Try
| Variation | What to Change | Flavor Profile Based on Subtitles |
| Alcohol-Free Tiramisu | Replace rum with extra coffee | Mild, coffee-forward, kid-friendly |
| Extra Boozy | Mix dark rum with orange liqueur or coffee liqueur | Warm, bold, aromatic |
| Citrus Tiramisu | Swap coffee for orange syrup or add citrus zest | Bright, refreshing, less intense |
| Berry Tiramisu | Replace espresso with berry purée | Fruity, tangy, lightly sweet |
| Chocolate Lover’s | Add chocolate ganache between layers | Rich, decadent, dessert-forward |
| Light & Airy Italian Style | Use whipped egg whites instead of whipped cream | Traditional texture, ultra-light |
| Coffee Intensified | Add coffee liqueur to mascarpone | Strong espresso punch |
Serving Suggestions
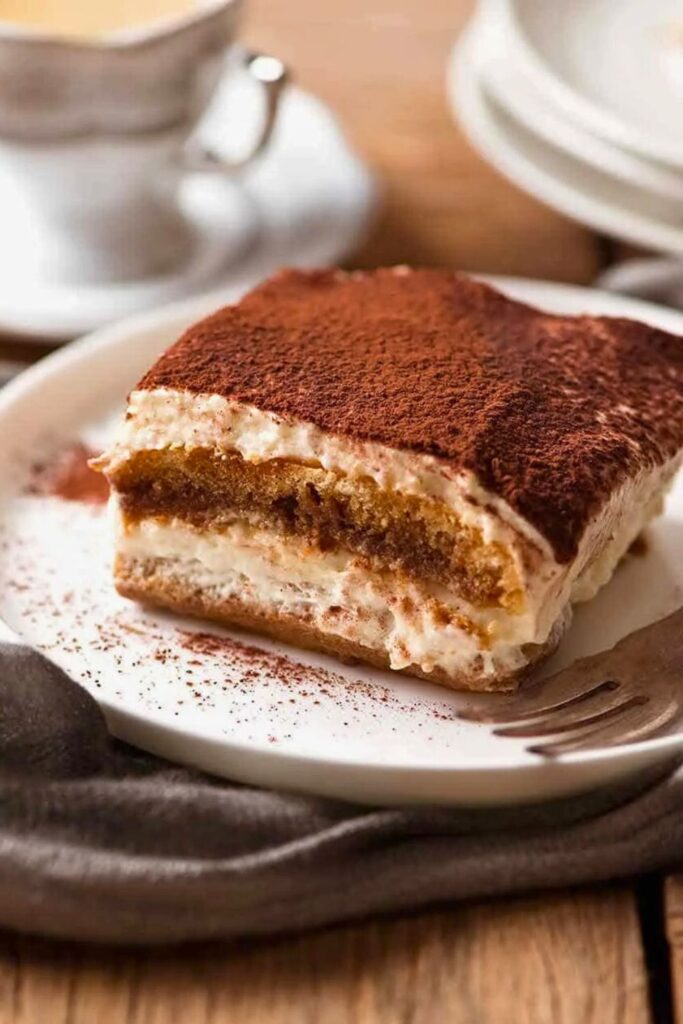
Tiramisu is a showstopper all on its own, but how you serve it can elevate the experience even more. For classic presentation, slice it into generous squares and dust with a bit of extra cocoa to freshen the top.
If you prefer a cleaner look for parties, wipe your knife between cuts to show off those beautiful layers.
You can also serve tiramisu in individual dessert cups or glass jars, which is perfect for events, date nights, or portion control.
Pair tiramisu with:
- A small shot of warm espresso
- A drizzle of chocolate sauce
- Fresh berries for contrast
- A sprinkle of shaved dark chocolate
This dessert works for nearly any occasion: holiday dinners, romantic evenings, brunch tables, and even breakfast (yes, it’s a treat!). Its creamy layers, coffee scent, and gentle sweetness make it a reliable crowd favorite.
Final Thoughts: Tiramisu Is Always a Good Idea
Whether you’re making it for a cozy night in, a dinner party, or a holiday gathering, tiramisu delivers every time. It’s elegant, comforting, and surprisingly easy to make.
So grab your mascarpone, brew that espresso, and whip up a dessert that everyone will remember.
And hey, don’t forget to save yourself the last bite. 😉
🍪 More Recipes You’ll Love
If you enjoyed making this creamy tiramisu, here are a few more Alleatify favorites to try next: each one is a cozy treat for cookie lovers and Pinterest bakers alike:
- 🍪 Easy & Chewy Monster Cookies Recipe You’ll Love: These cookies are bursting with oats, peanut butter, and chocolate chips, making them the ultimate chewy, chunky, and colorful treat.
- 🎄 Quick & Easy Thumbprint Cookies Recipe for Christmas: Classic holiday charm in every bite. These buttery cookies are rolled in sugar and filled with sweet jam, perfect for gifting or baking with kids.
- 🍫 The Cutest 30-Min Brownie Cookies Recipe for Girls: A fun mix of brownie richness and cookie crackle soft in the center, crisp on the outside, and done in just half an hour.
Each of these sweet bites pairs beautifully with a cup of coffee or espresso, the same way you’d enjoy a slice of tiramisu. Because after all, there’s always room for just one more cookie.