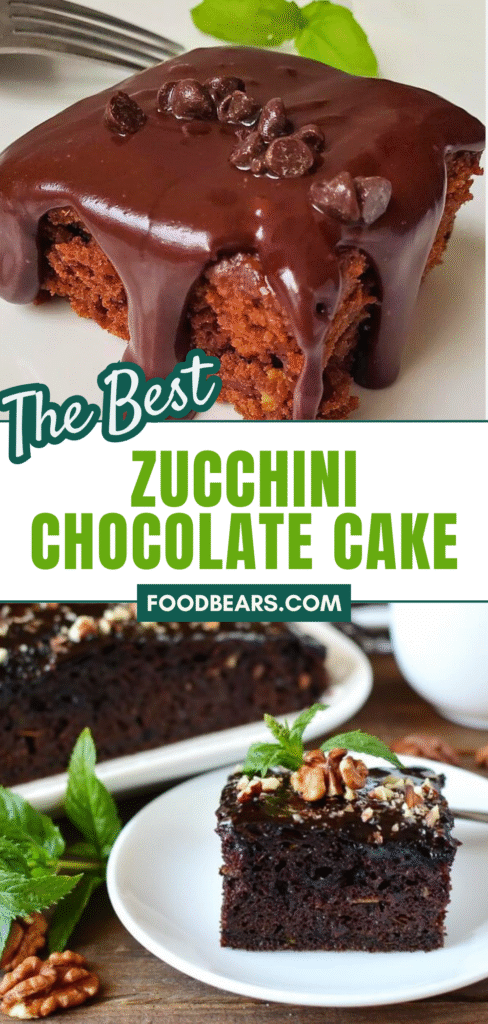
Easy 30-Min Zucchini Chocolate Cake Recipe for 2026

Ever wish you could sneak a few vegetables into your dessert without anyone noticing? Whether you’re baking for picky kids or veggie-averse adults, this zucchini chocolate cake is the answer. It’s intensely chocolatey, incredibly moist, and hiding a wholesome secret zucchini!
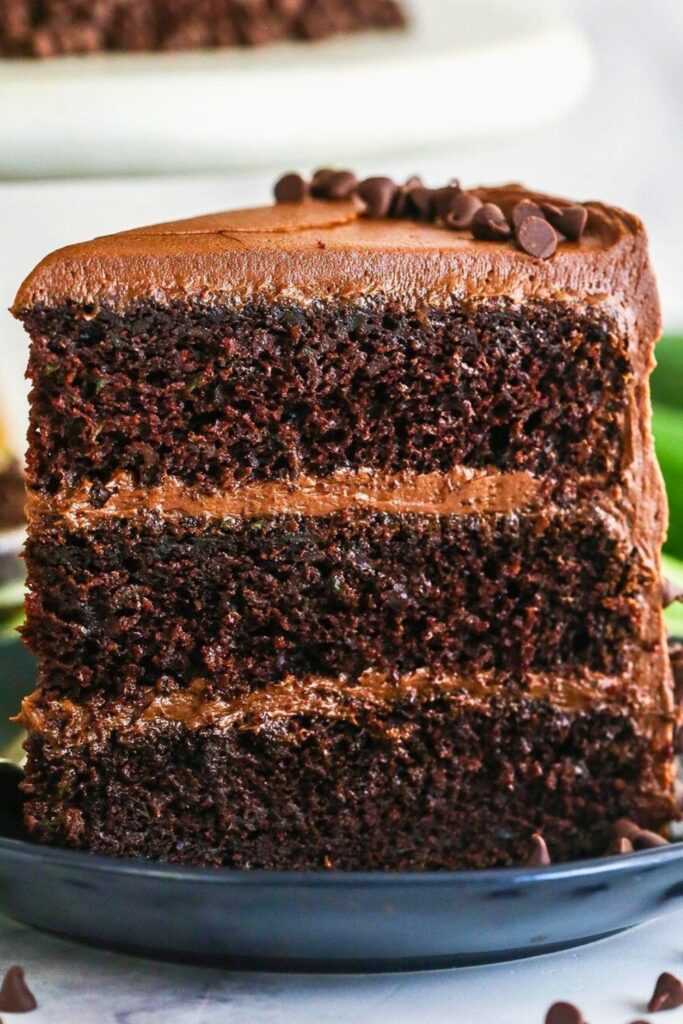
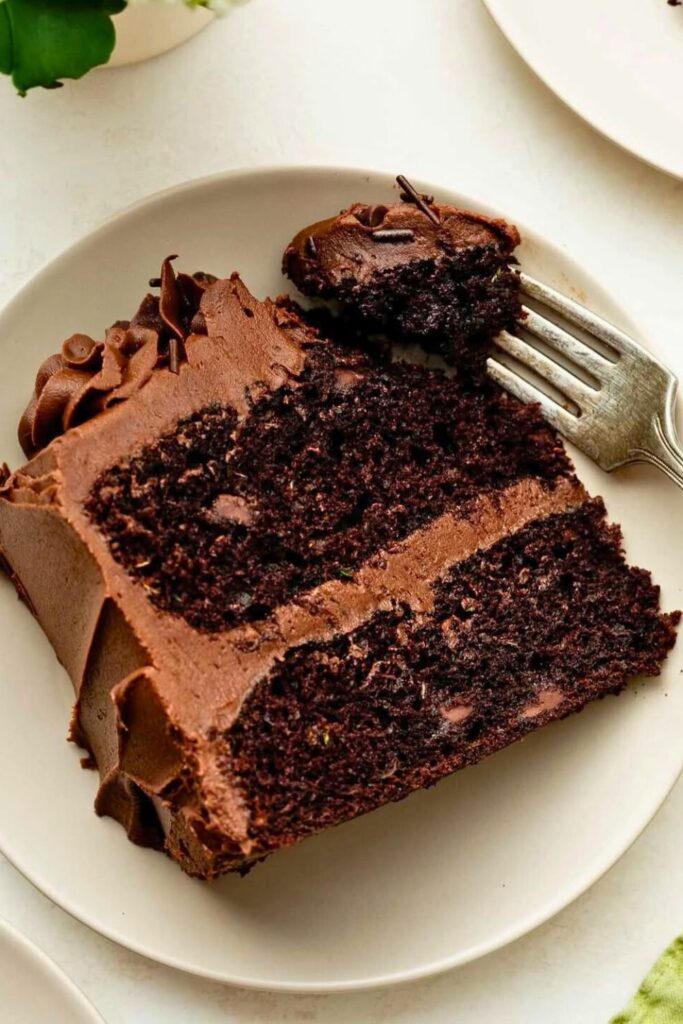
But don’t worry, this isn’t some soggy veggie loaf disguised as dessert. This is a three-layer showstopper that’s rich, decadent, and secretly packed with moisture-rich grated zucchini that disappears into the batter.
Even better? It’s easy to make, wildly satisfying, and perfect for birthdays, dinner parties, or just your average Tuesday.
Let’s dive into how this “ninja veggie” cake comes together.
Why You’ll Love This Zucchini Chocolate Cake
You’re probably wondering: Why put zucchini in a chocolate cake? Well, the answer is simple: moisture.
Zucchini works like magic in this recipe, adding an incredible moist texture without any noticeable taste. So, if you’re trying to sneak vegetables into a picky eater’s diet, this cake is your new best friend.
And don’t worry, this isn’t one of those desserts where you bite in and think, “Wait… is that a vegetable?” Nope. This cake is all about that deep, rich chocolate flavor.
The zucchini just disappears into the batter, doing its job quietly in the background, while your taste buds are front row at a chocolate concert.
Here’s why this cake is an absolute winner:
- It’s ultra-moist and rich, thanks to freshly grated zucchini and sour cream.
- It’s decadent and intensely chocolatey, with cocoa powder and a shot of espresso powder to bring out the best in the chocolate.
- It’s stealthy-healthy, making it perfect for feeding veggie-haters without the drama.
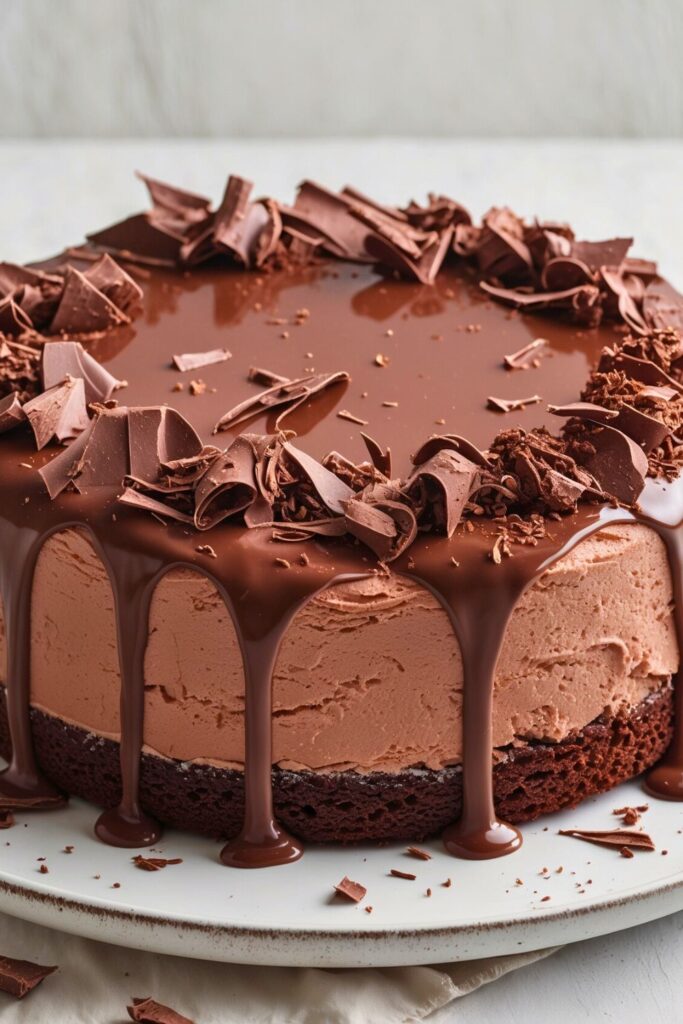
- It’s beautiful and dramatic, with shiny chocolate shards and smooth ganache drips perfect for birthdays, parties, or “just because” moments.
- It’s a big cake, with three impressive layers, meaning you can feed a crowd (or just yourself over a few glorious days).
This cake isn’t just about eating dessert; it’s about fooling everyone into thinking you’re just being indulgent, when really, there’s a little veggie win hiding in every bite.
Ingredients You’ll Need
Here’s the full ingredient list, broken down so you can prep like a pro. Everything in this recipe has a purpose, don’t skip the espresso powder unless you really have to. It gives the chocolate flavor that “wow” factor.
🧁 Dry Ingredients
| Ingredient | Amount | Purpose |
|---|---|---|
| All-purpose flour | 3 cups (360 grams) | Base structure of the cake |
| Cocoa powder (unsweetened) | 1 cup | Rich chocolate flavor |
| Baking soda | 1 tbsp | Helps the cake rise |
| Baking powder | ¾ tsp | Adds a gentle lift |
| Salt | ¾ tsp | Balances sweetness |
| Instant espresso powder | 1½ tsp (optional) | Intensifies the chocolate flavor |
💡 Pro Tip: Sift the dry ingredients together to avoid lumps, especially in the cocoa powder. Nobody wants a bitter clump of cocoa ruining their slice.
🥄 Wet Ingredients
| Ingredient | Amount | Purpose |
|---|---|---|
| Vegetable oil | 1½ cups | Keeps the cake moist and tender |
| Sour cream | ½ cup | Adds richness and moisture |
| Granulated sugar | 1½ cups | Sweetens and helps create structure |
| Light brown sugar (packed) | 1 cup | Adds moisture and deeper flavor |
| Vanilla extract | 1 tbsp | Enhances all the chocolatey notes |
| Eggs (large) | 6 | Binds everything and helps rise |
🥚 Room temperature eggs mix better and help the batter emulsify properly.
🥒 The Star Ingredient
| Ingredient | Amount | Purpose |
|---|---|---|
| Fresh zucchini (grated) | 4½ cups | Adds unbelievable moisture without taste |
- Use about 3 medium zucchinis.
- No need to peel unless you’re hiding it from suspicious eaters.
- Grate with a regular box grater fine or coarse both work.
🍫 Optional Add-Ins & Finishing Touches
| Ingredient | Amount | Purpose |
|---|---|---|
| Chocolate chips | 1½ cups | Adds gooey chocolate bursts inside |
| Dark chocolate (for shards) | ½ cup chopped | Decoration and snap |
| Heavy cream | ⅓ cup (for ganache) | Makes the ganache glossy and rich |
| Cocoa powder (dusting) | A pinch | Adds contrast to chocolate decorations |
Step-by-Step: How to Make This Zucchini Chocolate Cake
This cake might look like a showstopper (and it is), but the process is doable. Whether you’re an everyday baker or just love a sweet weekend project, these steps will guide you from grated zucchini to glorious ganache in no time.
Let’s get into it!
Step 1: Prep the Dry Ingredients
Before you get your hands sticky, start by prepping the dry mix. This helps prevent last-minute scrambling when things begin to move fast in the kitchen.
In a large bowl, sift together the following:
- 3 cups all-purpose flour (360g)
- 1 cup unsweetened cocoa powder
- 1 tablespoon baking soda
- ¾ teaspoon baking powder
- ¾ teaspoon salt
- 1½ teaspoons espresso powder (optional but recommended!)
Why sift? Because cocoa powder is notorious for clumping. If you skip this step, you might find dry pockets of cocoa in your batter, bitter and unpleasant. Sifting creates a smooth, uniform mix and incorporates a bit of air to keep the cake fluffy.
Once sifted, whisk everything together to ensure even distribution. Now set the bowl aside—we’ll come back to it once our wet ingredients are ready.
Pro Tip: If your cocoa powder is especially stubborn, press it through the sifter with the back of a spoon. You’re looking for a powdery, lump-free base.
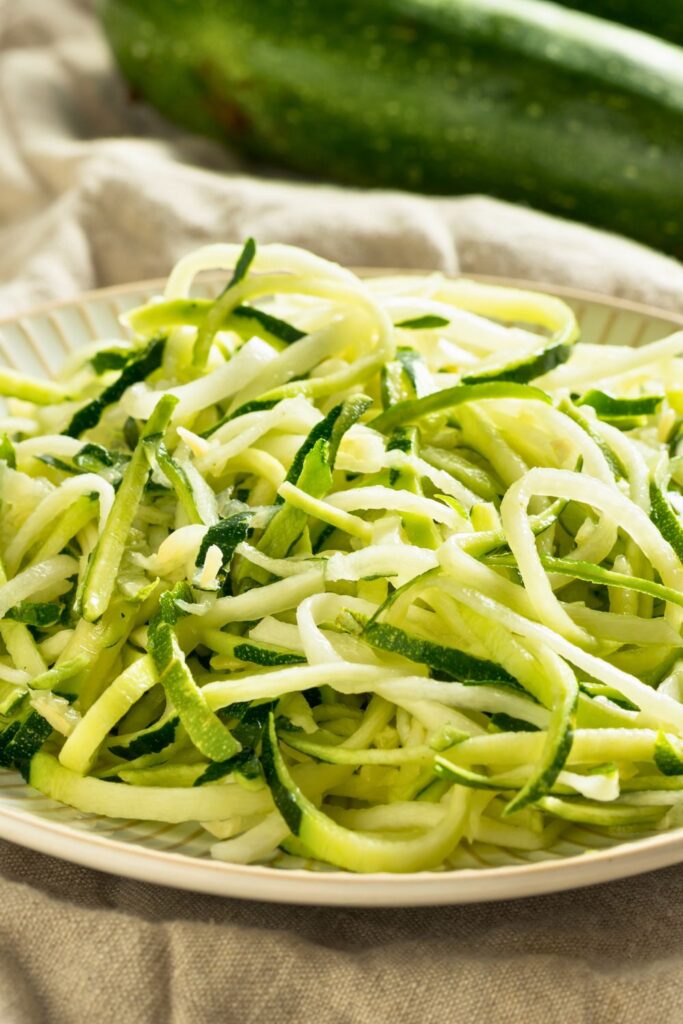
Step 2: Grate the Zucchini
This is where the magic happens. Zucchini might sound like a strange addition to chocolate cake, but here’s the deal: it vanishes into the batter while adding rich moisture. Think of it like nature’s hidden sponge.
Start by trimming the tops and bottoms of three medium zucchinis. You’re aiming for about 4½ cups of grated zucchini. Use a standard box grater, no need for fancy blades or food processors.
Peel or not to peel? If you’re hiding this from picky eaters, peeling removes the green flecks that might give away your secret. Otherwise, leave the skin on it adds texture and no one will notice.
Grate with care! Your fingers are precious. Cheese graters are sneaky tools, many a knuckle has fallen victim in the name of vegetables.
Once done, loosely pack the zucchini into a measuring cup. Don’t squeeze or drain it. This recipe is designed to use the natural water content.
Step 3: Mix the Wet Ingredients
This is where the rich flavor foundation starts.
In the bowl of a stand mixer (or large mixing bowl if using a hand mixer), add the following:
- 1½ cups vegetable oil
- ½ cup sour cream
- 1½ cups granulated sugar
- 1 packed cup light brown sugar
- 1 tablespoon vanilla extract
- 6 large eggs (room temperature)
Start mixing on low to avoid splashing. Once the ingredients begin to come together, bump it up to medium and let it go for about 1–2 minutes.
You want a smooth, glossy mixture that looks well-blended. There should be no visible streaks of eggs or lumps of sugar.
Now for the star player, zucchini! Add in all 4½ cups and mix on low. The batter will look a little strange at this point (almost like a slaw smoothie), but that’s normal. Trust the process.
Personal Note: This stage always feels like mixing salad into cake batter—but once it’s baked? Pure chocolate heaven. The zucchini disappears, leaving behind only moisture and richness.
Step 4: Combine Wet and Dry
It’s time to bring the party together.
Slowly add your dry ingredients into the wet mix. You can do this in batches if you want more control, but the shortcut version works OK—dump the whole bowl in and mix carefully on low.
Go slow here. That cocoa powder wants to fly everywhere, and no one enjoys cleaning chocolate dust off the walls.
Mix until everything is thoroughly combined. If needed, use a spatula to scrape down the sides and bottom of the bowl to make sure nothing’s hiding.
Now comes the indulgent option: chocolate chips. Stir in 1½ cups of your favorite chips, dark, semi-sweet, or even chunks. These will create gooey bursts of chocolate inside the cake layers.
Optional Pro Tip: Finish folding the batter by hand with a spatula. This lets you catch any flour pockets the mixer might have missed and gives you control over mixing in the chips evenly.
The final batter should be thick, shiny, and look like brownie batter on steroids. If you sneak a taste (and you will), you’ll barely notice the zucchini, just deep, fudgy chocolate goodness.
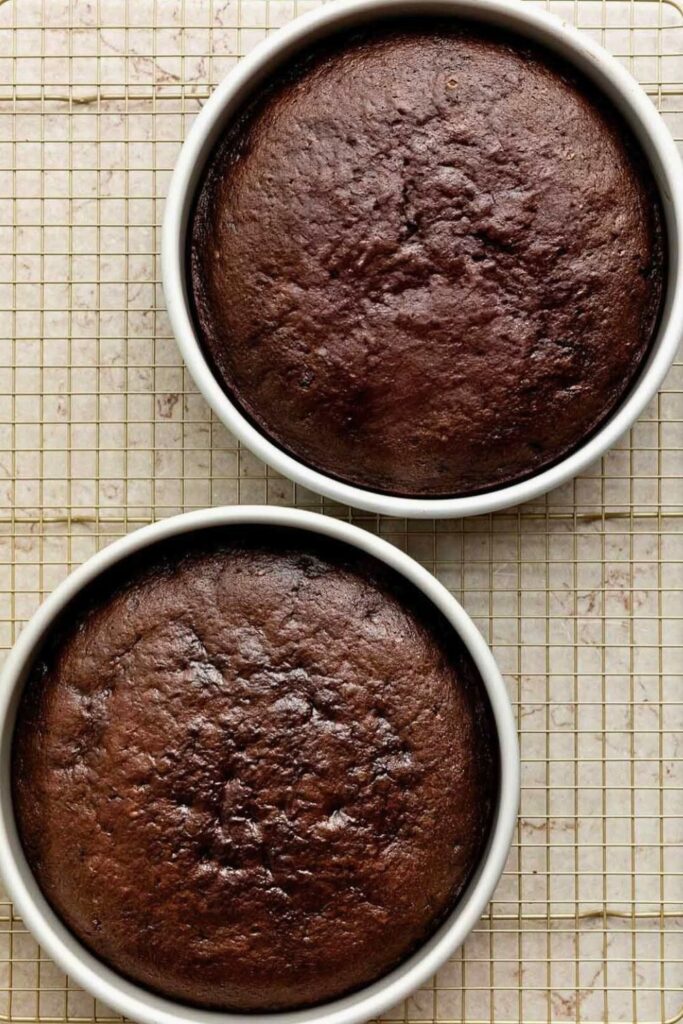
Step 5: Prepare the Cake Pans
This cake bakes into three gorgeous, tall layers, so proper prep is key.
You’ll need:
- Three 8-inch round cake pans
- Butter or baking spray
- Parchment paper rounds
- Optional: cocoa powder for dusting
Here’s how to do it right:
- Grease each pan with butter or non-stick spray.
- Place a parchment round on the bottom.
- Dust the sides lightly with cocoa powder (instead of flour) to prevent sticking and keep the cake looking rich and dark.
Now divide the batter evenly between the pans. Aim for around 750–800 grams of batter per pan if using a kitchen scale.
No scale? Eyeball it by filling each pan about ¾ full. The batter is thick and dense, so it holds shape well.
Want perfectly flat cake layers? Wrap each pan with cake strips. These are damp cloth bands that go around the outside of the pan to prevent doming. You can buy them or DIY with wet paper towels and foil.
Step 6: Bake It Up!
It’s time for the oven to work its magic.
- Preheat your oven to 350°F (175°C).
- Place all three pans on the center rack (or rotate halfway through if your oven is small).
- Bake for about 40 minutes, or until a toothpick comes out with just a few moist crumbs.
This is a dense cake, so don’t panic if it takes a bit longer than a typical layer cake. The top should be set and springy, and your kitchen will smell like a chocolate dream.
Once baked, remove the pans and let the cakes cool inside for 10–15 minutes. Then, run a knife around the edge, flip the cakes onto a wire rack, and peel off the parchment rounds.
Let the layers cool completely before frosting. Seriously. If you rush it, the buttercream will melt, and no one wants a sad, sliding cake.Hot Tip: If you’re short on time, pop the layers (unstacked) in the fridge or freezer for 30 minutes to speed up the cooling.
Make It Stunning: Chocolate Shards & Ganache
If you want to wow your guests or your reflection, this cake isn’t just about taste. It’s about the look. And nothing makes a statement quite like chocolate shards standing tall over glossy ganache drips.
Let’s start with the fun (and slightly messy) part: the chocolate shards.
🍫 How to Make Chocolate Shards
You’ll need:
- ½ cup dark chocolate (chopped)
- A microwave-safe bowl
- A spatula or offset knife
- Parchment paper
Here’s how to do it:
- Chop your chocolate finely, then reserve about a third of it. This reserved portion will be added later to help “temper” the chocolate, giving it that glossy finish and satisfying snap.
- Microwave the remaining two-thirds of the chocolate in short bursts, about 30 seconds at half power. Stir between each round. Be patient. You don’t want to burn it.
- Once melted, stir in the reserved chopped chocolate. This brings the temperature down and introduces stable crystals back into the mix. It’s a shortcut method to temper chocolate without a thermometer.
- Spread the melted chocolate onto parchment paper using an offset spatula. Go thin and messy; your jagged edges look best for shards. Think rustic chic.
- Let it sit on a cool counter for a few minutes to harden. If your kitchen is warm, you can pop the tray in the fridge briefly.
- Once set, break it into pieces by hand. You can make large, dramatic shards or trim accents; it’s your call.
Bonus Tip: Sprinkle a little cocoa powder over the shards before they fully set for a gorgeous matte contrast. This also hides any dullness if your chocolate didn’t temper perfectly.
Now set the shards aside and prepare for the next step: the drip that ties it all together.
Make the Chocolate Buttercream Frosting
This is not the time for restraint. We’re making a rich, smooth, intensely chocolatey buttercream that covers every layer of this cake like a cozy, indulgent blanket.
Here’s what you’ll need:
🧈 Ingredients:
| Ingredient | Amount | Purpose |
| Unsalted butter | 1½ pounds | Base of the frosting |
| Salt | 1 teaspoon | Balances the sweetness |
| Cocoa powder | ⅓ cup | Chocolate flavor |
| Powdered sugar | 1½–2 pounds | Sweetness and structure |
| Strong espresso/coffee | 1–2 teaspoons | Deepens the chocolate flavor |
| Heavy cream (optional) | A splash | For creaminess and easy spreading |
Optional: You can sift the cocoa powder if you want a super smooth texture—but honestly, we’re living dangerously today, and a quick whisk works fine too.
🎂 How to Make It:
- Cream the butter in a stand mixer until light and fluffy, about 2–3 minutes. You want it pale, silky, and smooth.
- Add in salt and cocoa powder. Mix again until everything’s fully incorporated. Scrape the bowl down for good measure.
- Slowly add powdered sugar in batches. Don’t dump it all in at once unless you like sugar clouds exploding in your kitchen. Go in stages and keep mixing until it’s all combined.
- Add 1–2 teaspoons of espresso or strong coffee to enhance the chocolate flavor. If the frosting feels too stiff, add a splash of heavy cream to loosen it up.
- Whip the frosting for another 1–2 minutes until light and fluffy. Taste it, adjust sugar or espresso to your liking.
Tip: You’re not piping anything fancy here, so the consistency should be soft and spreadable, not stiff or dry.
This frosting is rich, smooth, and chocolate-forward without being too sweet. It pairs beautifully with the cake’s dark richness and keeps each bite indulgent.
Whip Up the Ganache Drip
No show-stopping cake is complete without that perfect drip. Enter: ganache, that silky, glossy layer of melted chocolate and cream that adds luxury to every bite.
🍮 Ganache Ingredients:
| Ingredient | Amount | Notes |
| Dark chocolate chips | ¾ cup | Or chopped chocolate |
| Heavy cream | ⅓ cup | Scalded (almost boiling) |
🍴 How to Make the Ganache:
- Heat your cream in the microwave until hot, just under a boil. You’ll see steam and small bubbles around the edges. That’s perfect.
- Place your chocolate chips in a heat-safe bowl. Pour the hot cream over the chocolate, making sure it’s fully covered.
- Let it sit for about 1 minute. Don’t stir ye, to give the heat time to soften the chocolate.
- Now stir. It’ll look messy and split at first, just keep whisking. It will magically turn into a shiny, silky ganache in about 30 seconds.
Suppose it’s too thick to drip, microwave for 5 seconds. If it’s too thin, let it sit at room temperature for 10–15 minutes. You want it pourable, not runny.
Ganache Trick: Test the drip on the side of a bowl before committing to the cake. If it slides down too fast, it’s too warm. Let it cool a bit more.
Once your ganache hits that perfect sweet spot, you’re ready for final assembly.
🎂 Assembling the Cake
You’ve made it this far, baked three glorious layers, whipped up decadent frosting, tempered chocolate like a pro, and nailed a silky ganache. Now comes the most rewarding part: putting it all together.
🛠️ What You’ll Need:
- Your 3 cooled cake layers
- A cake stand or serving board
- Offset spatula
- Bench scraper (optional for smoothing)
- Chocolate buttercream frosting
- Chocolate ganache (cooled to a dripping consistency)
- Chocolate shards (set and ready)
Step 1: Build Your Foundation
Place a small dollop of frosting in the center of your cake stand or board to anchor the first layer. Add the first cake layer, bottom side down, so the flat surface is on the bottom.
Step 2: Frost the First Layer
Spread a thick, even layer of chocolate buttercream on top using an offset spatula. Don’t skimp, this is where the indulgence begins.
Step 3: Add the Second Layer
Carefully place the second cake layer on top. Try to align it with the base layer. Frost again generously, smoothing it to the edges.
Step 4: Top It Off
Place the third and final layer on top. If it has a domed top, you can trim it with a serrated knife for a flatter finish or leave it slightly rustic.
Step 5: Cover the Cake
Now you’ll cover the entire cake with a layer of buttercream. You have two main choices:
- Complete Coverage: Add a thick, even coat for a polished, bakery-style cake.
- Semi-Naked Look: Spread a light layer and scrape off the excess with a bench scraper to expose a bit of the cake beneath.
💡 Tip: Smooth the sides with a bench scraper while turning the cake stand. Use your offset spatula to level the top.
Step 6: Add the Ganache Drip
Once your buttercream is smooth and slightly chilled, it’s time for the drip effect.
- Spoon or pour your cooled ganache onto the top of the cake.
- Let it naturally flow toward the edges.
- Use the back of the spoon to encourage a few drips down the sides.
Want a bolder look? Use more ganache. Want it more subtle? Just pour in the center and smooth it gently to the edges.
Step 7: Decorate with Chocolate Shards
Now, for the grand finale, the shards. Gently press each shard vertically into the top of the cake, creating height and contrast. Vary the sizes and directions for visual drama.
Sprinkle a little cocoa powder or espresso dust if desired, and take a moment to admire your masterpiece.
🍴 Serving Tips
Here’s how to get the best out of your freshly baked beauty.
🕒 When to Serve:
- Serve the cake at room temperature for the best flavor and texture.
- If stored in the fridge, let it sit out for 30–45 minutes before slicing.
🔪 How to Slice It Like a Pro:
- Use a sharp knife dipped in hot water (wipe between slices).
- Cut small slices, this cake is rich!
🧊 Storing the Cake:
- Countertop: 1 day (covered, room temp)
- Fridge: 4–5 days (in an airtight container)
- Freezer: Wrap layers in plastic wrap + foil, freeze up to 2 months
🎉 Planning for a party? Bake the cake layers a day ahead, frost and decorate the day of serving.
🔄 Variations to Try

This cake is flexible! If you’re in the mood to experiment or need to adjust for dietary needs, here are some ideas:
| Variation | What to Do |
| Gluten-Free | Use a 1:1 gluten-free baking flour mix like Bob’s Red Mill or King Arthur |
| Vegan | Use flax eggs (1 tbsp flax + 3 tbsp water per egg), dairy-free sour cream, and vegan butter |
| Mocha Boost | Double the espresso powder and add a teaspoon to the ganache and buttercream |
| Nutty Chocolate Cake | Stir ½ cup chopped walnuts or hazelnuts into the batter |
| Zucchini-Carrot Mix | Replace half of the zucchini with grated carrots for a subtle, earthy flavor |
| Mini Cakes | Bake in 6-inch pans for more miniature celebration cakes or individual layers |
| Cupcake Version | Bake at 350°F for 20–24 minutes in cupcake tins, makes about 24 cupcakes |
🌿 Fun idea: For kids’ parties, top with rainbow sprinkles instead of shards. For adults, go with espresso beans or even edible flowers.
Final Thoughts: The Best Cake with a Secret Veggie Twist
This zucchini chocolate cake is the kind of dessert that surprises everyone, rich, moist, intensely flavorful, and hiding something wholesome. Whether you’re trying to sneak in more veggies, impress guests with a dramatic dessert, or just treat yourself to the best chocolate cake of your life, this one has it all.
From the fudgy layers to the creamy frosting and the show-stopping chocolate shards on top, this is a cake that hits every note.
🔗 You May Also Like:
Looking for more creative ways to use zucchini in the kitchen? Don’t miss these crowd-pleasing recipes:
👉 Quick Grilled Zucchini Recipe in Just 20 Minutes!
Light, smoky, and perfect for summer BBQs, this easy side dish brings out the natural sweetness of zucchini with bold garlic-balsamic flavor.
👉 Easy Zucchini Casserole for Busy Moms in 15 Minutes
Cheesy, comforting, and low-carb, this quick-bake casserole is ideal for weeknights when you want something warm and satisfying with zero fuss.